Posts

Home Sweet Home Wreath

Image
 Hello!!! I wanted to make something different, something OTP, so I stared at this Polystyrene Round base from Krafters Korner and thought, a wreath, a Home Sweet Home wreath. So I glued some background paper down, wrapped a ribbon around the base and then continued thinking.... I wanted the title to stand out, so I used Tim Holtz Faded Jeans Distress Oxide to back the Title banner paper. Once I was happy with the border to give it more depth, along with some foam stuck to the back of the banner, I started to fussy cut some leaves from the Lemoncraft - Serenity Collection and a wreath Die. I used the Fleur Thickers for the border, I felt they matched wonderfully!  I went around and around placing leaves on the outside until I was happy with the thickness of it. I then placed the leaves I had fussy cut, adding them last so they would stand out more. I felt the top and bottom needed something and played with a few things, ending up with the flowers. I am really happy with ...

Beautiful - 3Quarter Sunset Journal Collection

Image
  I am in love with 3Quarter designer paper. It's always beautiful and the Sunset Journal Collection is definitely wonderful with the amazing purples and sunset colours.. My first thought was to colour my chipboard pieces with the Nuvo Mica Mist and I love how they came out! I then went through and fussy cut all the flowers and pieces on the cut apart papers.  I played around with where I wanted my main pieces to fit on the already lovely decorated paper. I then proceeded to create a real layered effect, with the fussy cut pieces, some scrap material and flowers. I love the end design. And can't wait to create more with this paper!

Here Together - Prima Golden Desert

Image
Wow!! I can't believe it is February already! Where have the laast few months gone?!? Possibly the busiest months of the year for me. I don't tend to get a lot of scrapbooking done, but I certainly get lots of photos! So my first start to blogging for Scrap of Your Life is a 12 x 12 and pocket page layout. And I get to use this beautiful Prima Golden Desert collection!  I was captivated with the succulents on the Desert Blooming paper, so even though I am not a fan of fussy cutting, away I went... and I actually found it rather soothing and relaxing (I recently purchase Tim Holtz scissors and oh boy they help immensely!) I also used it to back my photo on the pocket page layout. I like to use the same paper or embellishments when creating a double layout. Helps draw the eye across both layouts. I liked the darker elements with all the pinks and purples, so I made sure my layout was balanced to the eye with the scattering of the darker  Golden Desert - Journaling Cards ...

Envelope Mini Album - Heid Swapp Old School

Image
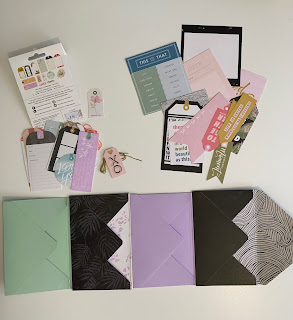
When I received Heidi Swapp's Old School to create a layout for Scrap of your Life, I knew I wanted to use it all!!!      So I decided I would do an Envelope Mini Album.  I made several 4x6 sized envelopes with We R Memory Keepers Envelope Punch Board. And then adhered them together. I then lay out the tags and cut apart sheet to work out what colours / tags I wanted to use. I created mini pockets and used brads to make things move. I decided I would make this and give it to my daughter, so I wanted lots for her to do with it.  I left blank cards for places for her to write about the photos she will add. And I loved adding the Heidi Swapp Sticker Phrases! Such a great idea to have the description of words, such as Pretty and Happy. I then turned the envelopes over and created more pockets and decorated it with stickers form the Old School Sticker sheet. I also used some washi here and then, helping give the design an overall tied together feel. I sewed...

Summer Splash - Mini Album

Image
I love repurposing some craft supplies, especially when you can find them on special or in your stash! So I used these Heidi Swapp Pocket Page Planner inserts to make a mini album of a holiday my family and I recently had. Then bound them with a clip. I loved using my Nuvo Mica Mists so much with the chipboard, I sprayed and splattered a 3Quarter Chipboard to use as a title. I love the effects you can create. I sprayed with Nebula Blue and then splashed some Oriental Fushcia on it. I printed and cropped my photos (a tad smaller than the 3x3" pocket sizes. Then I choose a page from the  3Quarter Designs - Fairground Fun Mini Collection (I am in serious LOVE with this paper!!!) And did a mock layout to get a feel for placement. Firstly I adhered my photos to paper and inserted them all into the pockets.  Then I started to write some journaling and make titles. I used some  Pink Paislee - Indigo and Ivy Embellishments - the sequins. I also used some Heidi Swapp washi tape. I...

Explore.....

Image
Today I worked on a beautiful flower photo that my daughter took with portrait mode on her iPhone. I am pretty impressed with it. I used the Pink Fresh Noteworthy collection. I also used a layered flower die from Kaiser and a leaf die from Sizzix (Now that I am blogging, I am really going to have to keep the names of my products! LOL) I want to accent the slight yellow in the flower and purple, so I used yellow and the deep maroon coloured papers. I loved putting this page together as I could use flowers and leaves as the photo itself was a flower.  I used the title 'Explore' as I had told my daughter to have a photo scavenger hunt as she was bored. And this is one of the photos she took.

Perfect You

Image
Perfect You - 3Quarter Paper and Dusty Attic Chipboards I absolutely loved making this layout! So many possibilities with a design like this. I used Dusty Attic Chipboards Blooms #4 and sprayed these with Nuvo Micra Mists Sprays to match my background paper 3Quarter Designs Fairground Fun. I used the Violet Lustre on the flowers and a mix of Pampas Grass and Nebula Blue on the title 'Perfect'. I felt the blue was so bright but the mix helped the title blend and match the paper perfectly (pun intended). In order to have the title stand out and add more elements to the page, I used stamps in the background. The paper was already grunge looking with black elements, so I added some more. Now my title blends but also stands out on the paper. Next I wanted to mount my photo to draw your eye to it. I framed it in black to really help it lift off the page. Then I used some of the cut aparts from the 3Quarter Fairground Fun mini kit. I used a Kaiser Die cut to make some decorative pap...